-
Shop
- Advanced Technologies
- AI Skills Mastery 2026 Collection
- Apple Accessories
- Arts, Crafts & Hobbies
- Best-Sellers
- Calvin Klein
- Car Accessories
- Christmas Collection
- Dating & Social Skills
- Denim
- 7FOR
- AGOLDE
- Antony Morato
- Armani Exchange
- Boss
- Brunello Cucinelli
- Calvin Klein Jeans
- Costume National
- Desigual
- Diesel
- Dolce & Gabbana
- Dsquared²
- Ermanno Scervino
- Fendi
- Gianni Lupo
- Guess Jeans
- Ichi
- Just Cavalli
- Lee
- Levi's
- Liu Jo
- Morgan De Toi
- Mother Denim
- Only
- Pepe Jeans
- Pinko
- Replay
- Tommy Hilfiger Jeans
- Valentino
- Vero Moda
- Digital Resources
- Car Buying & Ownership
- Cozy Feast Collection
- Emotional Intelligence
- Financial Education
- Home Styling & Organization
- Mindfulness
- Mindset
- Parenting & Child Development
- Pet Lifestyle & Wellness
- Positive Thinking
- Productivity
- Self Confidence
- Sleep Improvement
- Stress Management & Relaxation
- Travel Planning
- Yoga & Fitness
- Yoga & Mind-Body Practices
- Education & Learning
- Family & Parenting
- Fashion
- Accessories
- Alexander McQueen
- Bags
- Bags & Wallets
- Balenciaga
- Belts
- Blazers
- Blouses & Shirts
- Bottega Veneta
- Bottoms
- Brunello Cucinelli
- Burberry
- Chanel
- Chloé
- Dior
- Dolce & Gabbana
- Dresses
- Etro
- Gucci
- Hats & Hair Accessories
- Hoodies & Sweatshirts
- Jacquemus
- Jewelry
- Jil Sander
- Jimmy Choo
- Kiton
- Luggage
- Luggage Bags
- Men's Fashion
- Miu Miu
- Off-White
- Outerwear
- Prada
- Rick Owens
- Saint Laurent
- Skirts
- Socks & Tights
- Sunglasses
- Sweaters & Cardigans
- The Row
- Tom Ford
- Tops & Shirts
- Valentino Garavani
- Versace
- Vivienne Westwood
- Watches
- Fashion Accessories
- Furniture
- Gadgets
- Health & Beauty
- Health & Wellness
- Home & Garden
- Home Supplies
- Kids & Babies
- Lighting
- Patio, Lawn & Garden
- Personal Growth
- Pet Care
- Pet Supplies
- Pets
- Shoes
- Sport & Outdoors
- Super Deals
- Thanksgiving Digital Collection
- AI & Tech-Enhanced Thanksgiving
- Budgeting & Smart Shopping
- Eco-Friendly & Sustainable Thanksgiving
- Family & Kids
- Gift Ideas Guides
- Gratitude & Mindfulness
- History & Meaning
- Hosting & Planning
- Leftovers & Storage
- Pets & Thanksgiving
- Social Media Captions & Ideas
- Thanksgiving DIY Ideas
- Thanksgiving Recipes
- Thanksgiving Products
- Travel
- Wealth
- Wealth Building
- Budgeting & Saving
- Cryptocurrency Investing
- Debt Management
- Entrepreneurship & Business Growth
- Family Finance & Budgeting
- Financial Independence
- Financial Mindset & Psychology
- Financial Planning
- Frugal Living & Expense Hacks
- Goal Setting
- High-Income Skills
- Investing Basics
- Leadership
- Motivation
- Networking & Mentorship
- Passive Income Strategies
- Real Estate Investing
- Side Hustles
- Stock Market Investing
- YouTube Shorts Best-Sellers
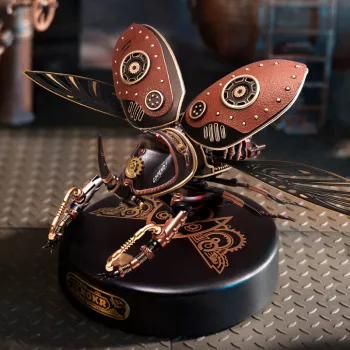
3D Insect Puzzle Kit Guide: Build a Display-Ready Model

3D Insect Puzzle Kit: Build, Display, and Learn Through Hands-On Assembly
A 3D insect puzzle kit combines the satisfaction of building with the curiosity of natural science. With layered parts that form a realistic insect model, it works as an engaging activity for kids, teens, and adults—whether the goal is a weekend craft, a classroom-friendly STEM project, or a display piece for a shelf or desk. Along the way, builders get a closer look at insect anatomy and structure in a way that feels more like creating than studying.
What a 3D Insect Puzzle Kit Is
A 3D insect puzzle kit is a buildable model where flat or pre-cut pieces assemble into a three-dimensional insect form. Instead of simply “solving” a puzzle and putting it away, you end up with a finished object that can be displayed and revisited.
- A buildable model where flat or pre-cut pieces assemble into a three-dimensional insect form.
- Typically designed to strengthen spatial reasoning, patience, and step-by-step problem solving.
- Often used for educational play, family activities, hobby builds, and display décor.
For families and classrooms, these kits can pair nicely with reliable insect references like the Smithsonian National Museum of Natural History insect resources or an overview such as Britannica’s insect guide.
Who Enjoys It Most
- Kids who enjoy crafts, building sets, and nature themes (with adult support for younger builders).
- Teens and adults who like model-making, puzzle challenges, and desk-friendly collectibles.
- Teachers and homeschoolers looking for hands-on science activities tied to insects and anatomy concepts.
- Gift-givers seeking a screen-free activity that results in a finished display model.
It’s also a strong pick for anyone who likes “process hobbies”—the kind where the calming rhythm of small steps is just as rewarding as the final reveal.
Skills It Helps Practice
Even when it’s chosen purely for fun, a 3D insect puzzle kit naturally exercises several useful skills that transfer to other building, crafting, and learning tasks.
- Fine-motor control through fitting and aligning small pieces during assembly.
- Spatial reasoning by translating 2D parts into a stable 3D structure.
- Following multi-step instructions and sequencing tasks logically.
- Focus and resilience—redoing steps and correcting alignment without rushing.
For students, the “hands-on” aspect can make insect body segments and proportions easier to remember than a diagram alone—especially when you’re physically placing parts where they belong.
What to Look For Before Buying
Not all kits build the same way, and the best choice depends on who’s assembling it and how it will be used afterward. Before adding one to a cart, it helps to check a few practical details.
- Recommended age range and difficulty level (beginner vs. advanced builds).
- Material type and durability for repeated handling and long-term display.
- Build time estimate and number of pieces (short project vs. extended challenge).
- Instruction clarity: numbered parts, diagrams, and whether tools/adhesives are required.
- Display readiness: base/stand included, stability, and finished size.
Quick Checklist for Choosing the Right Kit
| Feature | Best for | What to check |
|---|---|---|
| Difficulty | First-time builders | Fewer steps, larger parts, clearer diagrams |
| Piece count | Longer, more immersive builds | Higher count with labeled parts and organized packaging |
| Material | Display durability | Sturdy construction and clean fit; edges that don’t fray or crack easily |
| Assembly style | Mess-free building | Tool-free or minimal-tool design; no glue required if preferred |
| Finished size | Shelf or desk display | Dimensions that fit the intended space; includes a stand if needed |
How to Get the Best Build Experience
A few small setup habits can turn a “fiddly” build into a smooth, satisfying one—especially if the kit has many similar pieces.
- Lay out pieces by type or number before starting; keep small parts in a tray.
- Dry-fit tricky connections first to confirm orientation and alignment.
- Work on a flat, well-lit surface; avoid bending parts beyond their intended angle.
- Take short breaks during longer builds to reduce errors from fatigue.
- If building with kids, assign steps by complexity—simpler connections first, then detailed sections.
If you’re building as a group project, it can help to designate one person as the “instruction reader” while others assemble; it reduces backtracking and keeps the pacing steady.
Care, Storage, and Display Tips
In-Stock Picks to Pair With Your Build
- 3D Insect Puzzle Kit — A hands-on build designed for an engaging assembly experience and a display-ready result. Suitable as a giftable activity set for nature lovers and builders who enjoy detailed models; check current price and availability before ordering.
- 6pcs Transparent Plastic Christmas Ball Ornaments — Handy for keeping tiny spare pieces visible and contained, or for crafting a themed display accent if you like making a shelf vignette around your finished insect model.
- Portable Camping Cooler Bag — Useful as a roomy “project tote” when you want to bring a kit to a classroom, club meeting, or weekend trip and keep parts and instructions together.
FAQ
How long does it take to build a 3D insect puzzle kit?
Build time can range from about 30–60 minutes for simpler kits to several hours for more detailed, higher-piece-count models. First-time builders often take longer, and sorting parts before starting can noticeably reduce total time.
Is a 3D insect puzzle kit appropriate for kids?
Many kits work well for kids, but the right choice depends on the recommended age and the size/complexity of the pieces. Younger children typically do best with adult help for small parts and step sequencing, while older kids and teens can often complete builds independently if the difficulty matches their experience.
Do these kits need glue or tools?
Requirements vary by kit: many are designed for slot-and-fit assembly with no glue, while others may use optional adhesive or simple tools for extra stability. Checking the product details and instructions is the best way to confirm what’s needed before you start.
Recommended for you


Was this article helpful?
Yes
No


Leave a comment